среда, 24 мая 2017 г.

Union Jack Flag

I absolutely love everything British! From the history to the accent. I recently bought my first house. So it's the first time I am able to do whatever I want in it, plus am willing to spend the time and money. I bought an older home with almost 3700 sq ft. It has a room they consider the library. I decided that this was going to be my room to have fun with the decor and truly express myself.


My main focus is the Union Jack Flag painted as an accent wall. I cheated and called in my dad for help with the measurements lol...here's what we did...


union jack flag, home decor


First I primed the wall. I bought white primer and asked the paint employee to add a little bit of black so I could get a gray primer. This is VERY important when using red. Just trust me on this. I painted the rest of my walls blue, so I bought a gallon of that. For the white and red I just bought the sample size. It took two red and one white. They run about $3 each. We next drew everything out on the wall. We had to find the center point of the wall and based on the size of the wall, made our marks of each line. A good idea that we used was we marked each area with the letter of the color it was supposed to be so there wouldn't be any confusion later on. It's very important that you use pencil so that the paint will cover it up. The most time consuming part, but one of the most important is the taping off. I did the red first then the blue. Since the colors don't touch I could do both at the same time.


union jack flag, home decor


I let each color dry overnight before taking the tape off. But even at this stage you can see how it's coming along.


union jack flag, home decor


It may look finished here but this is just the blue and red done I still have to do the white. But you can see why it's so important to use the tape, look at those nice crisp edges.


union jack flag, home decor


union jack flag, home decor


union jack flag, home decor


union jack flag, home decor


union jack flag, home decor


union jack flag, home decor


union jack flag, home decor


Those are a few of the things I have in my British room lol. I hope you have enjoyed. I absolutely love the room and couldn't be happier with the end result. I hope it will inspire you to go full force and all out with your passion!!


union jack flag, home decor


Original article and pictures take http://www.hometalk.com/13649550/union-jack-flag site

DIY Storage Boxes From Up-cycled Cardboard Boxes


Hello fabulous Hometalkers! Today we are making beautiful instant storage boxes for almost... FREE!


These boxes are perfect for organizing a pantry, cleaning supplies or craft materials. And they are super easy to make!


diy storage boxes from up cycled cardboard boxes, organizing, repurposing upcycling, storage ideas


diy storage boxes from up cycled cardboard boxes, organizing, repurposing upcycling, storage ideas


Got cardboard boxes?? And burlap coffee bean bags?
First cut the lids off a cardboard box or push them inside against the 4 sides.


diy storage boxes from up cycled cardboard boxes, organizing, repurposing upcycling, storage ideas


There are different ways to attach the fabric to the storage box which will decide how wide to cut the burlap.


diy storage boxes from up cycled cardboard boxes, organizing, repurposing upcycling, storage ideas


First way to do this is to use a finished edge of the burlap as the top edge. Rotate the box as you apply glue to each side and press the burlap stripe onto each side.


diy storage boxes from up cycled cardboard boxes, organizing, repurposing upcycling, storage ideas


Finish by snipping the burlap where the corner turns, fold and glue the edges to the bottom. This step is easier with hot glue.


diy storage boxes from up cycled cardboard boxes, organizing, repurposing upcycling, storage ideas


For the stencils, all you need is some craft paint, and Scotch tape!


diy storage boxes from up cycled cardboard boxes, organizing, repurposing upcycling, storage ideas


I made one with the tape running horizontally, and another one vertically. So many way to create simple yet beautiful designs!


diy storage boxes from up cycled cardboard boxes, organizing, repurposing upcycling, storage ideas


Check out the link below to see more detailed tips plus how to make triangle stencils - super easy too!


diy storage boxes from up cycled cardboard boxes, organizing, repurposing upcycling, storage ideas


Original article and pictures take http://www.hometalk.com/13647240/diy-storage-boxes-from-up-cycled-cardboard-boxes site


How to Make a Tulip Wreath


Tulip wreaths are very popular for Spring and make great gifts, especially for Mother's Day! When I went into my local craft store and found tulip bushes on sale, I knew I had to make something spectacular with them. This is what I came up with, a simple yet elegant Spring Tulip Wreath. Let me show you how I made it.
NOTE FOR A FULL VIDEO, PLEASE CLICK ON MY BLOG LINK BELOW


FOR A LIST OF SUPPLIES & WHERE I PURCHASED THEM, PLEASE REFER TO MY BLOG LINK BELOW


how to make a tulip wreath, crafts, flowers, how to, seasonal holiday decor, valentines day ideas, wreaths


Step 1 - Wrap Wreath
Wrap the satin ribbon around the wreath frame so that the wreath does not show through. Use a floral pin to secure the end of the ribbon to the wreath. Wrap the ribbon around the wreath keeping the ribbon snug and overlapping it.


how to make a tulip wreath, crafts, flowers, how to, seasonal holiday decor, valentines day ideas, wreaths


Once you have finished, use another floral pin to secure the end. NOTE: If you make the ribbon the same color as the tulips, it helps to camouflage any holes you may have where the tulips don't touch. (See Video Below)


how to make a tulip wreath, crafts, flowers, how to, seasonal holiday decor, valentines day ideas, wreaths


Step 2 - Cut Stems from Bush
Push the leaves and the grass blades up close to the tulip blossom. Then use wire cutters to separate the floral stems from the bush keeping the stems long.


how to make a tulip wreath, crafts, flowers, how to, seasonal holiday decor, valentines day ideas, wreaths


Step 3 - Attach Flowers
Use floral pins to secure the floral stems to the wreath form making sure to overlap the previous stems. First I make a single layer or row going from the outer side of the wreath, over the front of the wreath, and then inside the inner part of the wreath.


how to make a tulip wreath, crafts, flowers, how to, seasonal holiday decor, valentines day ideas, wreaths


Then add another layer just under the first layer making sure the second layer tulips are touching the first layer tulips. Continue adding more tulips in this fashion, row after row, securing with floral pins.


how to make a tulip wreath, crafts, flowers, how to, seasonal holiday decor, valentines day ideas, wreaths


You may need to add floral pins to the ends of the flower stems as you go since you kept the stems long (see video below). Make sure to place the flower stems going in the same direction working around the entire wreath.


how to make a tulip wreath, crafts, flowers, how to, seasonal holiday decor, valentines day ideas, wreaths


Step 4 - Fill in Holes
Use leftover flower stems to go back and fill in any holes you may have. Place the stems of the filler flowers down and underneath flowers that are already pinned and secure the filler flowers with flower pins.


how to make a tulip wreath, crafts, flowers, how to, seasonal holiday decor, valentines day ideas, wreaths


Step 5 - Hot Glue Loose Buds
Hot glue any loose tulip buds that have fallen off into any holes you have or to make the wreath fuller. You can also hot glue the greenery too if needed,


how to make a tulip wreath, crafts, flowers, how to, seasonal holiday decor, valentines day ideas, wreaths


Step 6 - Add a Hanger
Cut a piece of 1.5" ribbon to the length you desire for a hanger. Tie a knot on the end. Place the hanger on the back and use floral pins both above and below the knot to hold it in place. (See video)


how to make a tulip wreath, crafts, flowers, how to, seasonal holiday decor, valentines day ideas, wreaths


There you have it, a beautiful tulip wreath for your home or to give as a gift. Where would you hang this wreath in your home? What is your favorite spring flower if not a tulip? You can use other flowers too besides tulips, use whatever your local craft store has on sale.


how to make a tulip wreath, crafts, flowers, how to, seasonal holiday decor, valentines day ideas, wreaths


This wreath would be great for a little girls room, hostess gift, powder room or anywhere you want to add a bit of springtime to your living space. Please feel free to share, Pin and let me know how your tulip wreath turns out.
Happy Wreathing,
Julie


how to make a tulip wreath, crafts, flowers, how to, seasonal holiday decor, valentines day ideas, wreaths


Original article and pictures take http://www.hometalk.com/13645789/how-to-make-a-tulip-wreath site


Quick and Easy Valentine Project - Vintage Style

What can you do with two vintage heart shaped cake pans and a small milk glass vase? Make one adorable heart shaped tiered stand.


First, gather your supplies. My inspiration was fining the two heart shaped pans at the thrift store for 95 cents each. I already had the small milk glass vase, glue, and candy.


quick and easy valentine project vintage style, crafts, repurposing upcycling, seasonal holiday decor, valentines day ideas


Measure the length and width of your pan to find the center. Then glue the narrow part of the vase to the center of the cake pan that will serve as the bottom tier. Let it sit about an hour, then glue the larger end of the vase to the cake pan that will serve as the top tier. Let it dry overnight.


quick and easy valentine project vintage style, crafts, repurposing upcycling, seasonal holiday decor, valentines day ideas


See, easy peasy.


quick and easy valentine project vintage style, crafts, repurposing upcycling, seasonal holiday decor, valentines day ideas


Yummy!


quick and easy valentine project vintage style, crafts, repurposing upcycling, seasonal holiday decor, valentines day ideas


Original article and pictures take http://www.hometalk.com/13644964/quick-and-easy-valentine-project-vintage-style site

DIY Rag Rug by Gemma Cooper


This rug is gorgeous for any little girls room.!
This post was submitted via Grillo Designs for Gemma Cooper - a member of the facebook group Grillo Designs Home Decorating, Upcycing and DIY group.
For those that dont know, Grillo Designs is a diy, home decorating and upcycling blog). We have a facebook group too where people like to share their most recent projects (you can join the group by searching the name on facebook) This is one of them!
I hope youll click over to see the full tutorial!
>>>>GET THE RAG RUG TUTORIAL HERE


diy rag rug by gemma cooper, crafts, reupholster


diy rag rug by gemma cooper, crafts, reupholster


You can see more of our group members projects by heading over to the blog and searching members project!


diy rag rug by gemma cooper, crafts, reupholster


Original article and pictures take http://www.hometalk.com/13641453/diy-rag-rug-by-gemma-cooper site


If You Had $1,000 to Spend on Your Next Project, What Would You Do?


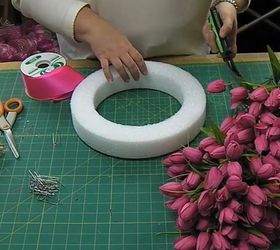
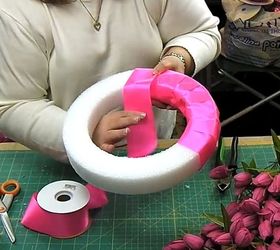
As much as we would all love to redo and refresh our homes from top to bottom, there's always that one thing that makes it kind of difficult...money!


Well, we were wondering - what if you didn't have to worry about the money?
Imagine it's your birthday...or it's Christmas...or maybe you won the lottery - either way, you just got $1,000 to spend towards your next home improvement project. So, what are you gonna do with it? Play along and share your dream plan with us in the comments below!


if you had 1 000 to spend on your next project how would you do it, chalk paint, crafts, gardening, home decor, home improvement, home maintenance repairs, kitchen cabinets, kitchen design, outdoor living, painted furniture, painting, pallet


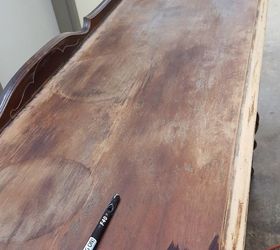
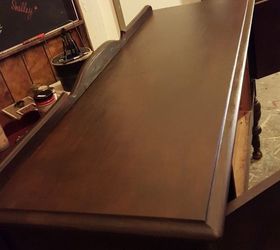
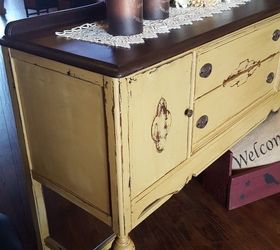
Original article and pictures take http://www.hometalk.com/13640392/if-you-had-1-000-to-spend-on-your-next-project-how-would-you-do-it site


She Was Headed to the Dump.....


This 1920's Jacobean Buffet had lived in a garage and served as a potting bench for years when I stumbled across her.....


She didn't look to bad from the front, but oh, her top.....ugh


she was headed to the dump, painted furniture


I was up to the challenge!


she was headed to the dump, painted furniture


It only took me about 10 minutes to sand her top down. I wanted to preserve the "vintage" feel of her, so I left the random water rings and imperfections.


she was headed to the dump, painted furniture


Three coats of Kristi Kuehl Pure Home Paint and Finishes 100% Non-Toxic Protective Wood Stain, in Chestnut, and I am ready to paint her "body"!


she was headed to the dump, painted furniture


I chose Pure Home Paints Golden Rule, Heavily Distressed and Sable Protective Glaze.


she was headed to the dump, painted furniture


She turned out Primitively BEAUTIFUL♡♡♡♡


she was headed to the dump, painted furniture


She will be MUCH LOVED in her new home!


she was headed to the dump, painted furniture


Original article and pictures take http://www.hometalk.com/13639508/she-was-headed-to-the-dump site