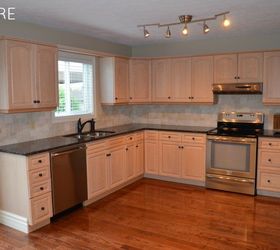
The kitchen was in great shape, the cabinets had recently been refinished and there was newly installed backsplash and granite counter tops. But the overall feel of the kitchen was dark and dull, exactly what we didn’t want.
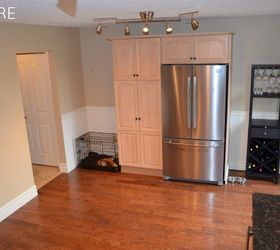
Here are a couple of before pictures.

With all of this is mind we got to work. My incredibly talented husband did everything himself and I am so proud of the beautiful kitchen we created for us. I am going to let him jump in now with the specifics.
When we moved into our house the kitchen had two separate areas – the main prep area and a space for a kitchen table. We determined we didn’t need a sit-down dining area in the kitchen as we had a large dining room that we wanted to utilize. Instead, we decided to add an island, this would allow us to have additional counter space, as well as a place to sit down for a quick bite to eat. I moved the pantry and fridge from the back wall to the wall where the seating area was originally located. This provided a more open feel to the entire kitchen, created a better workflow and allowed us to accommodate the island we wanted.
Once we had moved the cabinetry, it was time to prep the kitchen for the rest of the work. Just like any project, this is probably the most tedious. But believe me, if you prep properly it will make the process go much smoother.

PREP
The first step is to carefully remove your cabinet doors, drawers, and hardware. Give them a good cleaning with a solution of TSP, which can be found at your local hardware or big box stores. It is important to remove the cabinet doors, drawers, and hardware, including the knobs and hinges before you clean to ensure you have proper access to clean all surfaces.
Before you begin removing the doors and drawers, here is an important tip. All of your doors and drawers are going to be slightly different, so to make the re-install much easier number each door and drawer. We simply used a marker, painter’s tape and Ziploc bags.
Mark the inside of each cabinet where there is a door or drawer with a number on painter’s tape.


Before you begin painting the cabinets, clean both sides of the doors and drawers with the same TSP solution you used for cleaning the hardware. You want to make sure there is no residual dirt or grease left over.

PRIMING
I have never liked painting. I think it’s tedious, time-consuming and takes a lot of patience to do it right. Since the kitchen is the hub of our house I knew I couldn’t rush through it. From my experience, the key to outstanding results are patience and using quality products. I went to Grey Bruce Paint & Décor (our local Benjamin Moore retailer) and asked for their advice. They recommended I apply a base using a product called STIX Waterborne BondingPrimer. This product adheres very well to all surfaces, including the laminate ends of the cabinets.
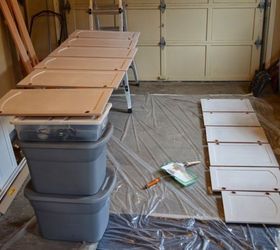
To add primer coat I used a standard mini foam roller and paint brush. I found the ideal method was to hold the door in one hand, coat all of the edges first and then lay it down on the 2 x 4’s and coat the rest of the surface. You want to ensure you add only a thin layer of primer to avoid drips, and you only need a thin coat to create a bondable surface. Start by priming the backs of each door and drawer, allow the primer to dry as per the supplier’s instructions and then repeat the same process on the front sides.
If you notice that any drip marks have made their way to the front, now is the time to sand them off.
And finally, you can move back to the kitchen and prime the cabinet boxes. I allowed the primed doors, drawers and cabinet boxes to cure for a full seven days before painting.
PAINTING
We used Benjamin Moore Advanced (Pearl Finish) in Mountain Peak White for the finishing coat. This is our favorite paint for refinishing furniture and cabinets, it’s amazing! It goes on smooth and self-levels to a perfect finish with no brush marks.
Use small mohair rollers and a good quality brush to paint your cabinets. Use the same method you did while priming to paint the cabinets. I applied very light coats to avoid any drip marks. In total, I applied three coats on the back of each door and drawer and four coats on the front. Apply three of four coats of paint to your cabinet boxes to ensure an even and full coverage.
Allow the painted cabinets to cure for four to five days before re-installing them in your kitchen. This is when you will be grateful you numbered each one!
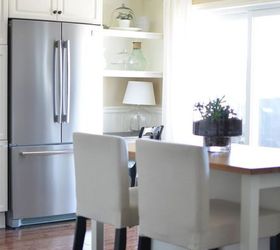
It’s been over three years and we still love our kitchen. It is the light, bright airy space we dreamed of. If you enjoyed our kitchen we would love for you to tour the rest of our home.

Original article and pictures take http://www.hometalk.com/13397775/how-to-paint-kitchen-cabinets site
Комментариев нет:
Отправить комментарий